This chapter will explain how to alter the lighting in your design. Altering the lighting in your design can dramatically improve the finish of your photo-realistic images. The amount of light required will vary from design to design. The size of the design and the materials used will require different lighting setups.
There is no right or wrong ways to light a particular design - just the one that you feel looks best. This chapter will cover the techniques you can use to create different effects within a design. It is up to you as the designer to apply them to your particular design and create the lighting setup that you feel is the best for your design.
For details of adding light fixtures to your design, see the "Accesories" examples in Adding units to your design.
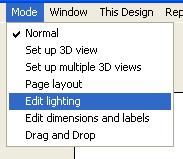
Click Mode - Edit Lighting. You can edit your lighting any time after completing the "Walls" layer in you design.
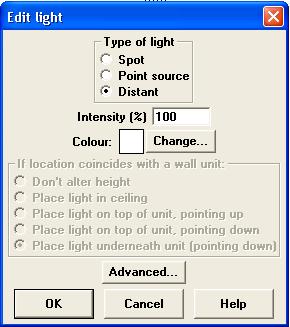
Double left-click on the light you wish to edit.
Single-left click where you wish your new light to be created. New lights are spot lights (see "Different light types" below). Edit the light to change the type.
Hold down the left mouse button and drag the light into it's new position.
Single left-click on the light you wish to delete. A black box will surround the selected light. Press the "Delete" (sometimes "Del") key on your keyboard. When prompted click "OK" to confirm you wish to delete the selected light.
If you wish to remove all the lighting in your design and start again, click "Edit" - "Delete all lights". When prompted click "OK" to confirm you wish to delete all the lights for this plan. See "The default light" below.
Return to top.

The default light is added automatically by ArtiCAD.
The position of the default light is the center of your design. It is a point source at 100% intensity at ceiling height (see "The different light types" for more detail). If you delete all the lighting in your design ArtiCAD will re-create this default light. You can edit and move this light exactly the same as any other light in your design.
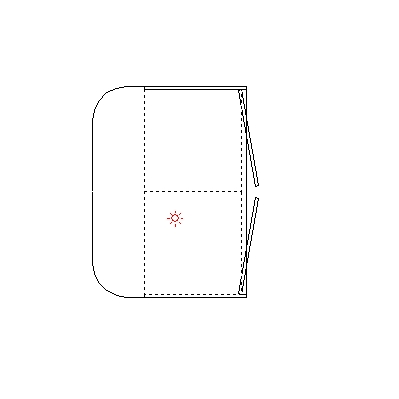
NOTE - the position is determined by the overall width and height of your design. If the room is an odd shape (e.g. an l-shape) the position will still be the middle of the design even if that is outside the walls layer. See "Examples" below.
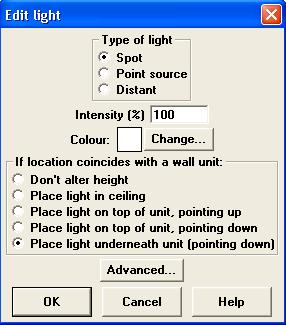
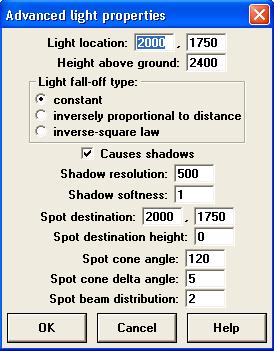
A spot light produces a cone shaped beam of light. A real world example would be a downlight under a wall unit. The width of the cone can be varied. The direction the light is shining in can also be changed.
By default, the spot light shines from the ceiling straight down onto the floor.
To change where the light is shining to on your design, hold down the right mouse button on the light source and drag to the desired location. In the above example the light is shinging from the light source towards the side of the cabinets. See "Spot destination", "Spot destination height" and "Examples" below.
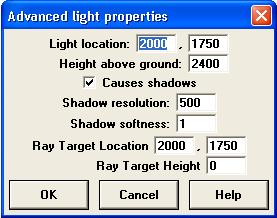
NOTE - if the position of the light source does not coincide with that of a wall unit, the height off the ground from which the light originates will default to the ceiling height for this design. See "Height bove ground" in the advanced section below for details on setting the height off the ground of the light source.
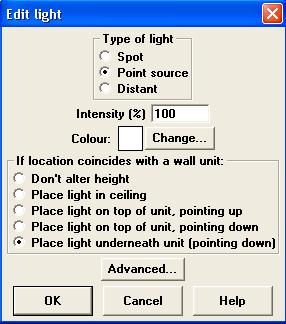
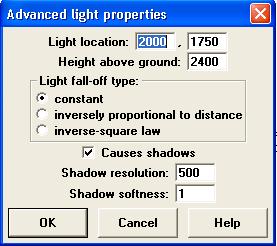
A point source emits light in all directions. A real-world example would be a standard light bulb.
NOTE - If the position of the light source does not coincide with that of a wall unit, the height off the ground from which the light originates will default to the ceiling height for this design. See "Height bove ground" in the advanced section below for details on setting the height off the ground of the light source.
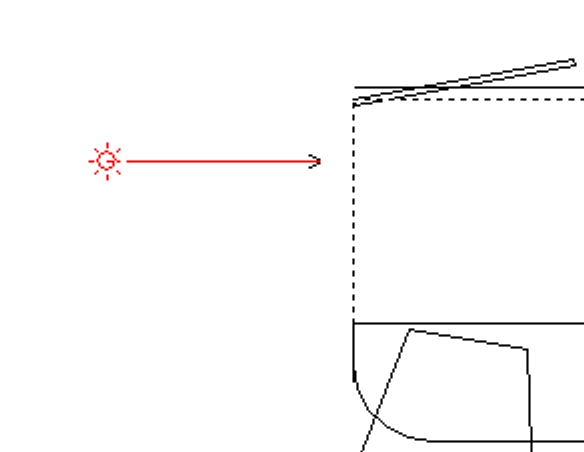
A distant light is used to simulate sunlight. The distant light is similar to the spot light and is used in the same way, except the light does not radiate from the light source but runs parallel to the direction specified. This is closer to the way real sunlight works. See "Examples".
To change where the light is shining to on your design, hold down the right mouse button on the light source and drag to the desired location. See "Ray Target Location", "Ray Target Height" and "Examples" below.
Return to top.
 Double-click to enlarge. Single-click to return to original size.
 Double-click to enlarge. Single-click to return to original size.
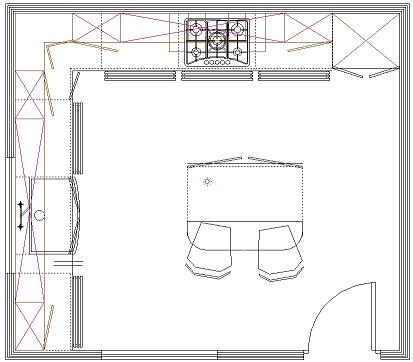
This design is using the default lighting settings - 100% intensity, white, ceiling height.
 Double-click to enlarge. Single-click to return to original size.

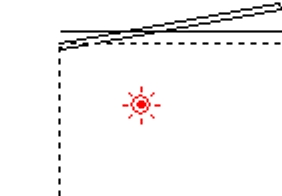
The default light positions itself in the middle of your design, not the middle of the room. The above design is 4000 high and 4000 wide, so the default light is positioned 2000 to the right and 2000 up from the start of the walls layer.
 Double-click to enlarge. Single-click to return to original size.
 Double-click to enlarge. Single-click to return to original size.
This causes a large area of shadow down the front of the tall units and almost no light reaches the top-right corner of the design.
 Double-click to enlarge. Single-click to return to original size.
 Double-click to enlarge. Single-click to return to original size.
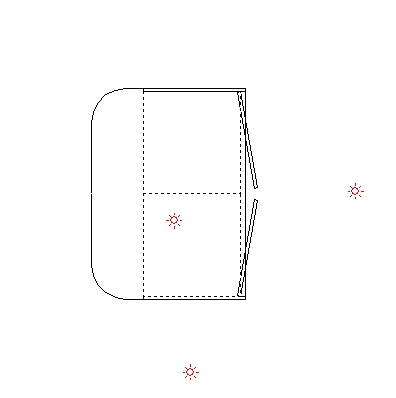
The default light has been moved (infront of the hob) and a second point source added (infront of the arch at the bottom of the design). Both lights have had their intensity set to 60%.
Moving the default light removes the shadow down the front of the units and provides illumination for the top-right corner of the design. The second light is added to provide more light at the bottom of the design. The intensity is reduced to avoid over-lighting the design (see below).
 Double-click to enlarge. Single-click to return to original size.
 Double-click to enlarge. Single-click to return to original size.
Extra light sources have been created and placed within the wall cabinets around the design. The default behaviour for the light when within a wall unit is to place itself under the unit, shining down. Therefore there was no need to edit lights, simply to place them in the correct location.
 Double-click to enlarge. Single-click to return to original size.
 Double-click to enlarge. Single-click to return to original size.
Four more light sources have been created and dragged into position around the middle of the design. Again, there is no need to edit the lights as the default is to place the light at ceiling height if not within a wall unit.
NOTE - the default light is still in the center of the room. You should keep the default light in your design to provide some ambient light to your design even if in reality the room will only have downlights. Though you can turn the intensity down to 20-30%.
However, all these lights are starting to overpower the the design and sections are starting to get washed out.
 Double-click to enlarge. Single-click to return to original size.
The most common mistake when editing the lighting for a design is to add too much light. As you can see in the above image, the floor has started to "wash out" due to excessive lighting.
All the lights added in the previous example are using their default settings. This means the intensity is set to 100%. To avoid washing out the design, decrease the intensity.
 Double-click to enlarge. Single-click to return to original size.
 Double-click to enlarge. Single-click to return to original size.
The above images show the same lighitng layout but with the intensity of all the lights decreased to 50%. Getting the balance of lighting (the number of lights vs. the intensity of each light) does take practice.
 Double-click to enlarge. Single-click to return to original size.
 Double-click to enlarge. Single-click to return to original size.
 Double-click to enlarge. Single-click to return to original size.
This design has a sloped ceiling. The wedge used to create the sloped ceiling effect covers the default light position. As a result the default light is inside the wedge and provides no light to the design. This produces an extremely dull, dark image (but not completely black).
 Double-click to enlarge. Single-click to return to original size.
The same design except the default light has had it's height off the ground reduced to 1800 so it is under the wedge.
Alternatively the default light could be left at the ceiling height and moved so it is no longer within the wedge. Use whichever method you feel gives the best image.
 Double-click to enlarge. Single-click to return to original size.
 Double-click to enlarge. Single-click to return to original size.
 Double-click to enlarge. Single-click to return to original size.
The default light is positioned close to one of the ceiling beams. This casts a large shadow to the right of the image.
 Double-click to enlarge. Single-click to return to original size.
 Double-click to enlarge. Single-click to return to original size.
The default light has been moved so it is centralised between the two beams and it's intensity reduced to 50%. Two extra light sources have been created. The first between the left-hand wall and the first beam, the second between the second and third beams. They are also point sources with an intensity of 30%. They have also had the "Causes Shadows" option turned off.
 Double-click to enlarge. Single-click to return to original size.
 Double-click to enlarge. Single-click to return to original size.
To put lights inside a unit, simply drag them inside then specify the height you want the light at.
Getting the light heights correct can involve some trial and error. It's recommended you position the lights roughly inside the unit and get the heights correct before stacking the lights on top of eachother.
The first example uses spot lights. The second uses point sources.
In both the example images the light intensity is 100%. The unit used is a display cabinet with 3 shelves. The light heights are set to 1200, 1500, 1800 and 2100.
Glass shelves do not let any light through i.e. you cannot put a light at the top of the unit and expect it to illuminate past the first shelf. You still need to add a light for each shelf.

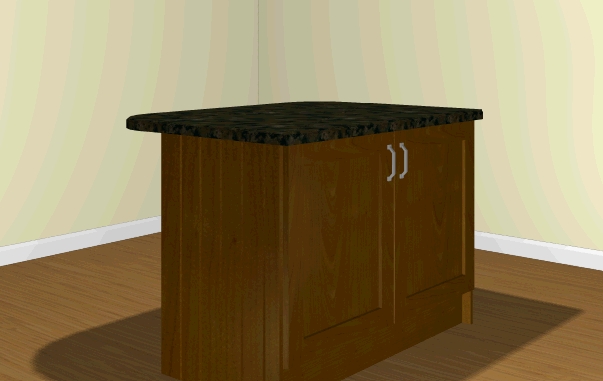
The island is directly below the default light. The shadow caused by the light obscures the detail on the side of the island (in this case T&G panelling).
The default light intensity has been reduced to 40%. Two extra point sources have been added, both set to 30%. Their height off ground is 450 and "Causes Shadows" has been switched off (to avoid the shadow of the island being projected on the opposing walls).
Return to top.